Introduction
This is a project I made for a study of perceived well-being in geriatrics. To measure perceived well-being of elderly people, various question sets could be used. These are known as RAI and RAVA. While producing apparently good results, they are quite exhaustive and possibly unsuitable for everyday use. So it was studied whether a simple data-logging device, featuring three buttons to represent mood of a person, could complement or replace the questionnaires in everyday use.
The study is available at:
http://www.ncbi.nlm.nih.gov/pmc/articles/PMC2791757/
It is widely known that in the geriatrics, the psychological well-being reflects also the physiological well-being, so a happy person will likely encounter no health problems in the future. Vice versa, a person with many consecutive days with a bad mood is likely to develop some health problems, which makes the studies like this important.
Planning
The project begun by evaluating an embedded electronics development platform called PDP, Product Development Platform, made by Nokia. It featured a quite powerful 32-bit microprosessor by Renesas but it was somewhat incomplete in terms of hardware and software development possibilites. After studying this PDP and Renesas processor with its open-source development possibilites and toolchains, I decided to “revert back” to good old 8-bit and use the Atmel ATMEGA 128.
The prototype of the device was urgently needed, so the fast development of the device was my goal. After drawing various concepts and evaluating different possibilities for both mechanical and electronics manufacturing, I decided to use parts that were readily available.
Electronics
The prototype device was built around Olimex ATMega 128 development board, https://www.olimex.com/Products/AVR/Development/AVR-MT128/ , which I modified a little. The device logged key presses to a MMC card which was easy to interface with the AVR with few pull-down resistors. As I had no SD/MMC card slot available, I found out that the 5,25″ floppy data cable connector had a same pin raster than the MMC card, so I used the connector as a make-shift card reader. The display was removed from the board to be located in the enclosure for easy access.
Mechanical design and enclosure
The most difficult part in almost every project is to pick a suitable enclosure for the electronics and this one did not make a difference. First I was planning to create a self-made fiberglass enclosures for the device, using a positive mold carved of foam, but it was deemed to be too time-consuming task as there was a possibility that several of these devices need to be built. Rapid prototyping devices like 3D-printers or bench-top CNC mills were quite rare back then. As the users of the device were elderly people, the the finished device needed to look like a ready professional product that looks tempting and easy to approach and use, with no tweaks and wires here and there.
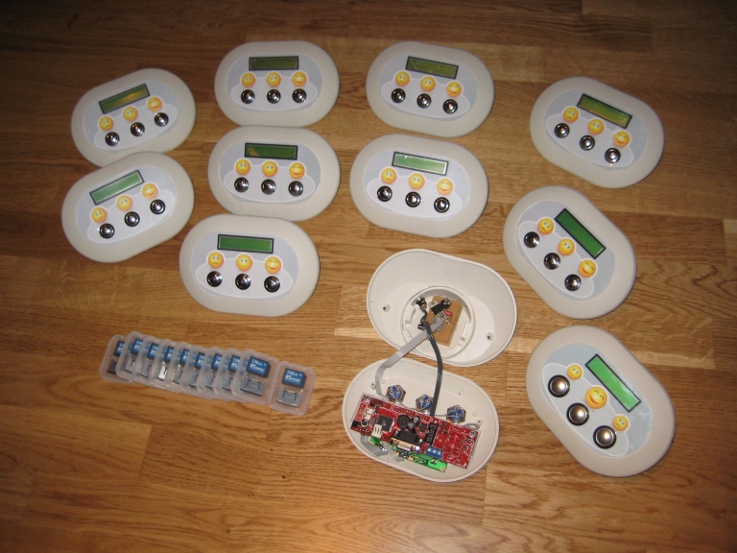
After searching the Web, I found the OKW, a company that makes good-looking plastic enclosures, along its Finnish supplier, Noretron. After contacting the company, they sent me some samples of the enclosures and I was immediately sold. 😉 The suitability for this purpose and the overall quality of the Art Case product line I chose for the prototype was so good that there was no point in manufacturing own enclosures any more. With the electronics and a make-shift card reader, three vandal-resistant stainless steel buttons and the face-plate was installed, making the prototype consisting wires and vintage computer parts, look like a finished product.
The user interface
Instead of some medical or scientific instrument, the device had to look nice and easy to use for elderly people. The oval-shaped enclosure, complete with a custom-made face-plate, finished with shiny metal buttons with good tactile feedback proved to be successful.
The buttons were hard to find. I searched various suppliers and I found only plastic buttons that were either cheap-looking or not firm enough with a good feedback. As I wanted the buttons have a good and sharp tactile feedback, I decided to use so called vandal-resistant buttons made of polished stainless steel, which looks very attractive (but are quite expensive).
The user interface consisted of three of these buttons, face-plate graphics, a buzzer and a small character LCD display for a device setup. After everything was set up for the first time, the display showed only a date and time which the user did not need to care about. When the user pressed the button according to his mood few times a day, the device wrote the input with a time stamp into a MMC card, and played a tone which represented the button pressed. The device played three different tones, varying from sad to happy according to the button pressed.
The ConDis device had also a possibility for five alarms to be set. At pre-selected times, the device could play a tune, reminding its users to press a button representing his current mood.
The face plate
The face plate design was especially important for this project. The first option that came my mind was to order a custom-made membrane keypad complete with graphics. After few phone calls to various suppliers, I found out that it would be far too expensive for only few devices, due to the rather high tooling costs. Something more affordable was needed.
I ended up with an experimental solution which proved to be adequate: I designed the graphics using the freely available Inkscape vector graphics editor and I printed them using a high-quality laser printer. After printing, I cut out the square aperture for the display and thermo-laminated the sheet of paper in plastic with a display hole in it. I then cut the holes for the buttons and finally the sheet in shape. With a Dremel rotary tool and small files, I prepared the plastic case for the installation of the electronics. After carefully finishing the enclosure and the laminated sheet, I glued it to the enclosure and installed the stainless steel buttons with a flange that hid the rough edges of the sheet and the enclosure, resulting a nice and neat finished product.
Software development
As there were no Arduinos around back then and I needed to complete the device at a tight schedule, I used the Procyon AVRLib which contains plenty of ready low-level routines for interfacing various devices like displays and SD/MMD cards. For evaluating the logged key presses, I had two alternatives: I had to write a software that could read the data from the device, store and display it, or use memory cards that could be read on a computer and use a data format that could easily be imported for example, to Excel. Needless to say, I chose the Excel route. The MMC card was formatted to a FAT file system, and a FAT library was used with the AVR to write data to the card. Although a small program that displayed the data collected using a simple graph, was written using Visual Basic and launched using autorun.inf every time the card was inserted into a computer, the Excel was used in analysis of the data.
Response
The prototype was first introduced to my co-workers and colleagues. Its looks, usability and overall finish was liked. When people that worked for few companies that produced medical devices and who were not aware that it was made by an individual in his home, saw the device first time, they were very surprised, not only by its professional look and feel but more of its origin. The device received such a good response that ten more devices was chosen to be produced. Good planning and parts sourcing helped me greatly in manufacturing ten more of these for the study, with only minor modifications to the prototype. For example, a real card reader was used in place of the floppy drive connector! 😉
The prototype of the device remains at my possession.